告别卡顿!Three.js百万面模型用GPU秒速拾取物体并计算交点
在三维场景开发中,物体选取和交点计算是最常见的交互需求之一。通常我们会使用three.js自带的光线投射器(Raycaster)来实现:
var raycaster = new THREE.Raycaster();
var mouse = new THREE.Vector2();

function onMouseMove(event) {
    mouse.x = event.clientX / window.innerWidth * 2 - 1;
    mouse.y = - (event.clientY / window.innerHeight) * 2 + 1;
}

function pick() {
    raycaster.setFromCamera(mouse, camera);
    var intersects = raycaster.intersectObjects(scene.children);
}
这种方法虽然简单直观,但存在一个致命问题:当模型面数很大时(比如40万个面),遍历所有三角面元计算交点会非常慢,严重影响用户体验。
GPU选取物体的原理
使用GPU选取物体可以完美解决这个问题。无论场景和模型有多大,都能在一帧内获取到鼠标所在点的物体和交点位置。
核心思想很简单:
- 创建选取材质,为场景中每个模型分配不同的颜色
- 读取鼠标位置的颜色值,根据颜色判断选中的物体
具体实现
1. 创建选取材质
遍历场景,为每个Mesh创建独立的着色器材质,分配不同的颜色值:
let maxHexColor = 1;

scene.traverseVisible(n => {
    if (!(n instanceof THREE.Mesh)) return;

    n.oldMaterial = n.material;
    if (n.pickMaterial) {
        n.material = n.pickMaterial;
        return;
    }

    let material = new THREE.ShaderMaterial({
        vertexShader: PickVertexShader,
        fragmentShader: PickFragmentShader,
        uniforms: {
            pickColor: { value: new THREE.Color(maxHexColor) }
        }
    });

    n.pickColor = maxHexColor;
    maxHexColor++;
    n.material = n.pickMaterial = material;
});
顶点着色器 PickVertexShader:
void main() {
    gl_Position = projectionMatrix * modelViewMatrix * vec4(position, 1.0);
}
片元着色器 PickFragmentShader:
uniform vec3 pickColor;

void main() {
    gl_FragColor = vec4(pickColor, 1.0);
}
2. 读取像素颜色并识别物体
将场景绘制到WebGLRenderTarget上,读取鼠标位置的颜色:
let renderTarget = new THREE.WebGLRenderTarget(width, height);
let pixel = new Uint8Array(4);

renderer.setRenderTarget(renderTarget);
renderer.clear();
renderer.render(scene, camera);
renderer.readRenderTargetPixels(renderTarget, offsetX, height - offsetY, 1, 1, pixel);

// 还原材质并获取选中物体
const currentColor = pixel[0] * 0xffff + pixel[1] * 0xff + pixel[2];

let selected = null;
scene.traverseVisible(n => {
    if (!(n instanceof THREE.Mesh)) return;

    if (n.pickMaterial && n.pickColor === currentColor) {
        selected = n;
    }

    if (n.oldMaterial) {
        n.material = n.oldMaterial;
        delete n.oldMaterial;
    }
});
说明:
offsetX和offsetY是鼠标坐标,height是画布高度。readRenderTargetPixels读取鼠标所在位置(offsetX, height - offsetY)的颜色,pixel是Uint8Array(4),分别保存RGBA四个通道,取值范围0~255。
使用GPU获取交点位置
获取交点位置的方法同样巧妙,核心思路是渲染深度信息并反算世界坐标。
1. 创建深度着色器材质
将场景深度信息编码为RGB值,渲染到WebGLRenderTarget:
const depthMaterial = new THREE.ShaderMaterial({
    vertexShader: DepthVertexShader,
    fragmentShader: DepthFragmentShader,
    uniforms: {
        far: { value: camera.far }
    }
});
顶点着色器 DepthVertexShader:
precision highp float;

uniform float far;
varying float depth;

void main() {
    gl_Position = projectionMatrix * modelViewMatrix * vec4(position, 1.0);
    depth = gl_Position.z / far;
}
片元着色器 DepthFragmentShader:
precision highp float;

varying float depth;

void main() {
    float hex = abs(depth) * 16777215.0; // 0xffffff

    float r = floor(hex / 65535.0);
    float g = floor((hex - r * 65535.0) / 255.0);
    float b = floor(hex - r * 65535.0 - g * 255.0);
    float a = sign(depth) >= 0.0 ? 1.0 : 0.0;

    gl_FragColor = vec4(r / 255.0, g / 255.0, b / 255.0, a);
}
重要说明:
gl_Position.z是相机空间中的线性深度,范围从cameraNear到cameraFar- 除以
far将其转换到0~1范围,便于作为颜色输出 - 使用RGB三个分量输出深度值,提高精度
- 不能使用屏幕空间深度(透视投影后是非线性的)
2. 读取并解密深度值
let renderTarget = new THREE.WebGLRenderTarget(width, height);
let pixel = new Uint8Array(4);

scene.overrideMaterial = this.depthMaterial;
renderer.setRenderTarget(renderTarget);
renderer.clear();
renderer.render(scene, camera);
renderer.readRenderTargetPixels(renderTarget, offsetX, height - offsetY, 1, 1, pixel);

if (pixel[2] !== 0 || pixel[1] !== 0 || pixel[0] !== 0) {
    let hex = (pixel[0] * 65535 + pixel[1] * 255 + pixel[2]) / 0xffffff;
    if (pixel[3] === 0) hex = -hex;
    cameraDepth = -hex * camera.far;
}
3. 计算交点世界坐标
let nearPosition = new THREE.Vector3();
let farPosition = new THREE.Vector3();
let world = new THREE.Vector3();

const deviceX = offsetX / width * 2 - 1;
const deviceY = - offsetY / height * 2 + 1;

// 计算近点和远点
nearPosition.set(deviceX, deviceY, 1);
nearPosition.applyMatrix4(camera.projectionMatrixInverse);

farPosition.set(deviceX, deviceY, -1);
farPosition.applyMatrix4(camera.projectionMatrixInverse);

// 线性插值
const t = (cameraDepth - nearPosition.z) / (farPosition.z - nearPosition.z);

world.set(
    nearPosition.x + (farPosition.x - nearPosition.x) * t,
    nearPosition.y + (farPosition.y - nearPosition.y) * t,
    cameraDepth
);
world.applyMatrix4(camera.matrixWorld);
实际应用场景
GPU选取和交点计算技术适用于对性能要求较高的场景:
- 鼠标Hover效果 - 实时高亮显示鼠标下的模型
- 模型放置预览 - 模型随鼠标移动实时预览放置效果
- 测量工具 - 距离测量、面积测量时实时计算并预览
- 大场景交互 - 场景和模型面数巨大时,避免光线投射法的性能问题
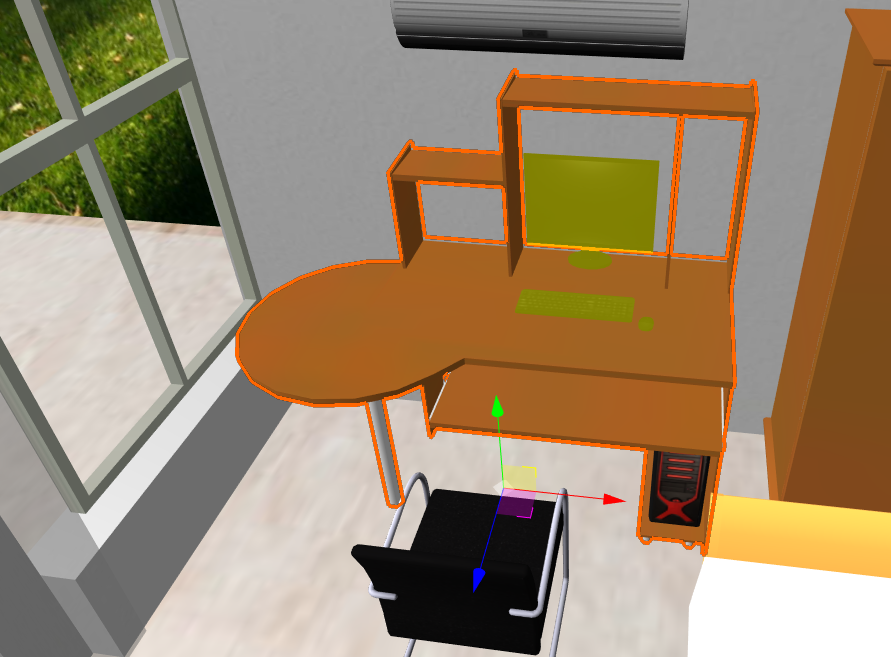
下图展示了使用GPU选取物体实现的Hover效果(黄色半透明)和选中效果(红色边框):
three.js投影运算速查
理解投影运算有助于掌握上述代码:
modelViewMatrix = camera.matrixWorldInverse * object.matrixWorldviewMatrix = camera.matrixWorldInversemodelMatrix = object.matrixWorldproject = applyMatrix4(camera.matrixWorldInverse).applyMatrix4(camera.projectionMatrix)unproject = applyMatrix4(camera.projectionMatrixInverse).applyMatrix4(camera.matrixWorld)gl_Position = projectionMatrix * modelViewMatrix * position
参考资料
OpenGL中使用着色器绘制深度值:https://stackoverflow.com/questions/6408851/draw-the-depth-value-in-opengl-using-shaders
在glsl中获取真实的片元着色器深度值:https://gamedev.stackexchange.com/questions/93055/getting-the-real-fragment-depth-in-glsl